Adding a Cycle Timer to the LinuxCNC / AXIS Interface
14/08/15 11:08
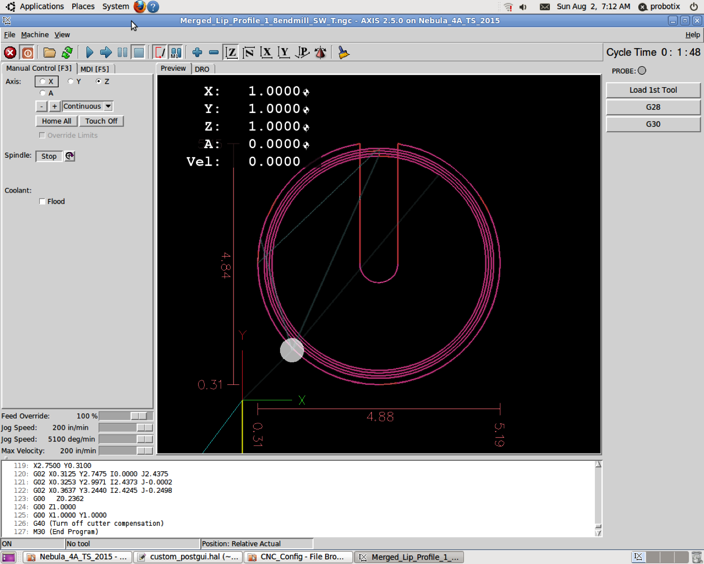
After making a few parts I was interested in seeing how close the estimated toolpath times that Aspire predicted matched the actual machining time. Unfortunately I couldn't find anything in the AXIS interface for LinuxCNC that would time the running of a program. So I e-mailed Len from Probotix and he pointed me to some helpful documentation that started me on the path to creating the timer you can see in the upper right corner of this screenshot (it is labeled Cycle Time -- but I have since changed it to just Time to save some screen area).

This timer works very well and it resets each time a new program is run (or paused) and also automatically stops when the program finishes.
Below are the steps I used to add the timer. One thing to note is that I have the tool sensor on my machine so that custom panel on the far right (with Probe, Load 1st Tool, etc.) was already part of my config. If you don't have the tool sensor you can use the tool sensor setup for your machine (it should work fine - as I had mine unplugged on accident for a while) or just compare them to the config files you are using to see how to add the custom bar. To find the different configuration files look in the probotix/linuxcnc/configs directory. Then look for the TS code in the naming convention for your machine --- for example I am using Nebula_4A_TS_2015.
In the custompanel.xml file (for me this was the file probotix/linuxcnc/configs/custompanel.xml) add these lines right after the first 3 lines (just after
Then edit the custom_postgui.hal file (which should be the same directory) and add these lines to the very end of the file:
# SEG 1 August 2015 -- hooking up cycle timer
loadrt time
#loadrt not
addf time.0 servo-thread
addf not.5 servo-thread
net prog-running not.5.in <= halui.program.is-idle
net cycle-timer time.0.start <= not.5.out
net cycle-seconds pyvcp.time-seconds <= time.0.seconds
net cycle-minutes pyvcp.time-minutes <= time.0.minutes
net cycle-hours pyvcp.time-hours <= time.0.hours
After those changes run the .ini file in that same directory which should start up LinuxCNC/Axis with the timer in the upper right corner!
Here are the final files with all of the changes given above: Nebula_4A_TS_2015.zip
References:
http://www.linuxcnc.org/docs/devel/html/man/man9/time.9.html
http://wiki.linuxcnc.org/cgi-bin/wiki.pl?SimpleCycleTimer
http://linuxcnc.org/docs/html/hal/components.html
http://linuxcnc.org/docs/html/hal/pyvcp_examples.html

This timer works very well and it resets each time a new program is run (or paused) and also automatically stops when the program finishes.
Below are the steps I used to add the timer. One thing to note is that I have the tool sensor on my machine so that custom panel on the far right (with Probe, Load 1st Tool, etc.) was already part of my config. If you don't have the tool sensor you can use the tool sensor setup for your machine (it should work fine - as I had mine unplugged on accident for a while) or just compare them to the config files you are using to see how to add the custom bar. To find the different configuration files look in the probotix/linuxcnc/configs directory. Then look for the TS code in the naming convention for your machine --- for example I am using Nebula_4A_TS_2015.
In the custompanel.xml file (for me this was the file probotix/linuxcnc/configs/custompanel.xml) add these lines right after the first 3 lines (just after
<vbox>):<!-- SEG 1-Aug-2015 adding a cycle timer. Also see changes in custom_postgui.hal -->
<hbox>
<label>
<text>"Time"</text>
<font>("Helvetica",14)</font>
</label>
<u32>
<halpin>"time-hours"</halpin>
<font>("Helvetica",14)</font>
<format>"2d"</format>
</u32>
<label>
<text>":"</text>
<font>("Helvetica",14)</font>
</label>
<u32>
<halpin>"time-minutes"</halpin>
<font>("Helvetica",14)</font>
<format>"2d"</format>
</u32>
<label>
<text>":"</text>
<font>("Helvetica",14)</font>
</label>
<u32>
<halpin>"time-seconds"</halpin>
<font>("Helvetica",14)</font>
<format>"2d"</format>
</u32>
</hbox>
<!-- end cycle timer -->Then edit the custom_postgui.hal file (which should be the same directory) and add these lines to the very end of the file:
# SEG 1 August 2015 -- hooking up cycle timer
loadrt time
#loadrt not
addf time.0 servo-thread
addf not.5 servo-thread
net prog-running not.5.in <= halui.program.is-idle
net cycle-timer time.0.start <= not.5.out
net cycle-seconds pyvcp.time-seconds <= time.0.seconds
net cycle-minutes pyvcp.time-minutes <= time.0.minutes
net cycle-hours pyvcp.time-hours <= time.0.hours
After those changes run the .ini file in that same directory which should start up LinuxCNC/Axis with the timer in the upper right corner!
Here are the final files with all of the changes given above: Nebula_4A_TS_2015.zip
References:
http://www.linuxcnc.org/docs/devel/html/man/man9/time.9.html
http://wiki.linuxcnc.org/cgi-bin/wiki.pl?SimpleCycleTimer
http://linuxcnc.org/docs/html/hal/components.html
http://linuxcnc.org/docs/html/hal/pyvcp_examples.html


